How to frame a scarf? Framing a scarf can transform it into a work of art, allowing you to showcase its intricate patterns, vibrant colors, and delicate textures. In this step-by-step guide, I will share with you how to frame a scarf and the art of framing a scarf, so you can display your favorite scarves as unique and eye-catching pieces of home decor.
Why frame a scarf?
You might be wondering why anyone would want to frame a scarf instead of simply wearing it. Well, framing a scarf offers several advantages. Firstly, it allows you to preserve and protect your scarves from damage caused by wear and tear. By framing them, you can prevent fading, fraying, and staining, ensuring that your scarves remain in pristine condition for years to come. Additionally, framing a scarf allows you to showcase its intricate details and design in a way that cannot be fully appreciated when it is draped around your neck. It elevates the scarf from a fashion accessory to a piece of art, adding a touch of sophistication and elegance to any room.
Materials needed for framing a scarf
Before we dive into the step-by-step guide, let’s gather the materials you will need for framing a scarf. Here’s a list of essential supplies:
- Scarf – Choose a scarf that you want to frame. Opt for one that has a design or pattern that you find visually appealing and that complements your home decor.
- Frame – Select a frame that fits the size of your scarf. Make sure the frame is deep enough to accommodate the thickness of the scarf.
- Acid-free matting – This will provide a protective barrier between the scarf and the glass, preventing any potential damage.
- Glass or acrylic – Choose a glass or acrylic sheet that is large enough to cover the scarf and fit into the frame.
- Mounting tape or pins – You will need these to secure the scarf to the matting and prevent it from shifting or sagging.
- Backing board – This will provide support for the scarf and keep it in place within the frame.
- Hanging hardware – Depending on the weight of the frame, you may need hooks, nails, or screws to hang it on the wall.
Now that you have all the necessary materials, let’s proceed to the step-by-step guide on framing a scarf.
Step-by-step guide on how to frame a scarf
- Prepare the frame: Remove the backing and glass from the frame. Clean the glass thoroughly to ensure it is free from dust and fingerprints.
- Mount the scarf: Lay the acid-free matting on a clean and flat surface. Carefully position the scarf on top of the matting, making sure it is centered and aligned. Use mounting tape or pins to secure the scarf in place. Avoid using adhesive directly on the scarf, as it may cause damage.

- Add the glass: Place the glass or acrylic sheet over the scarf, ensuring that it covers the entire surface. This will protect the scarf from dust and other elements.
- Secure the frame: Insert the scarf, matting, and glass back into the frame. Make sure everything fits snugly and is properly aligned. Attach the backing board to the frame using the provided clips or screws.

- Display and hang your framed scarf: Choose a suitable location to showcase your framed scarf. Consider the overall aesthetic of the room and the lighting conditions. Hang the frame securely on the wall using the appropriate hanging hardware.

Tips and tricks for framing a scarf
- Choose a frame that complements the colors and style of your scarf. Consider the overall theme of the room where you plan to display the framed scarf.
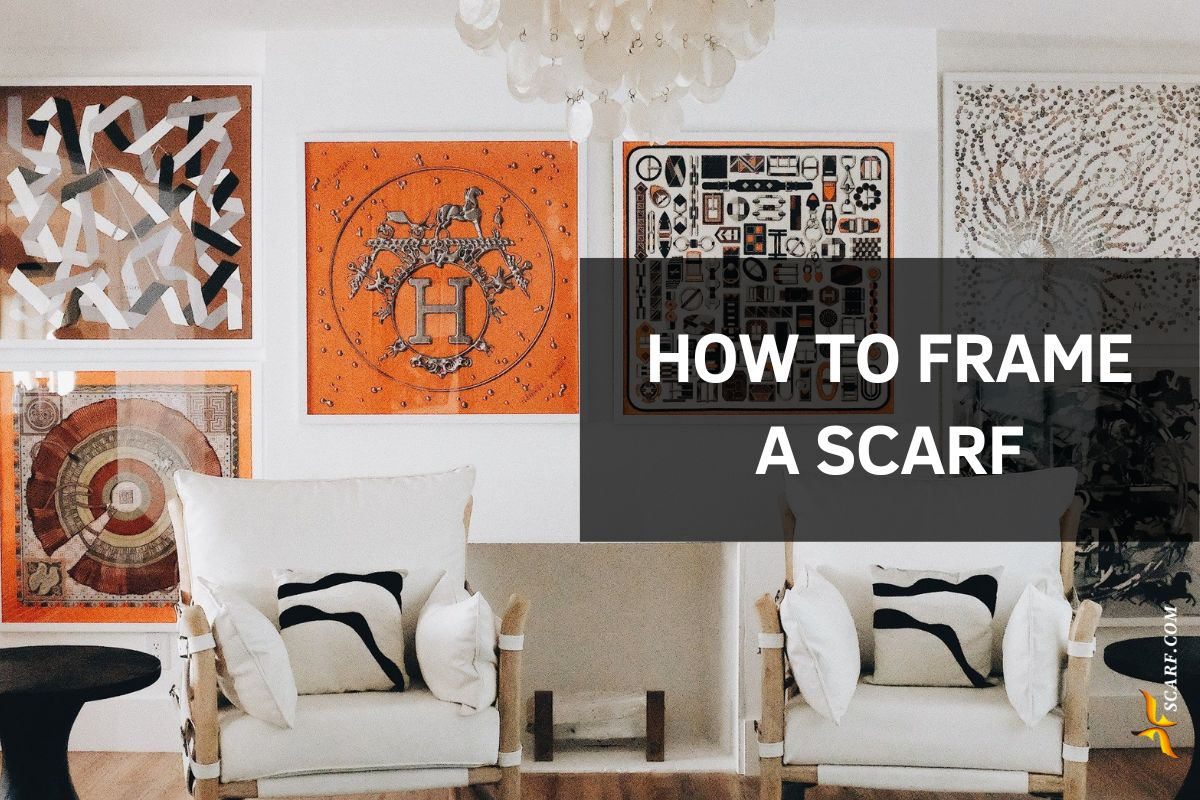
- If you have multiple scarves that you want to frame, consider creating a gallery wall with a collection of framed scarves. This can add visual interest and create a focal point in the room.
- Experiment with different folding techniques when mounting the scarf on the matting. You can create pleats, twists, or drapes to add dimension and visual appeal.
- Consider using a shadow box frame for thicker or more textured scarves. This type of frame provides extra depth and allows the scarf to be displayed without being compressed.
- If you are unsure about framing the scarf yourself, consider consulting a professional framer who can guide you through the process and ensure the best results.
Alternative ways to use scarves as home decor
Framing a scarf is not the only way to incorporate this versatile accessory into your home decor. Here are some alternative ways to use scarves as decorative elements:
- Drape a scarf over the back of a chair or couch to add a pop of color and texture to your living room.
- Use a scarf as a table runner or centerpiece to create a stylish and unique dining table arrangement.
- Hang a scarf as a window treatment to soften the look of your windows and add privacy.
- Transform a scarf into a throw pillow cover by sewing or using fabric adhesive to attach it to a plain pillowcase.
- Create a vibrant wall tapestry by hanging a collection of scarves of different sizes and patterns.
Examples of beautifully framed scarves
To inspire your own scarf framing project, here are some examples of beautifully framed scarves:
- The Silk Garden: A delicate silk scarf with a floral design, framed in a gold frame with a white matting. This framed scarf brings a touch of elegance and sophistication to a bedroom or dressing area.
- The Boho Chic: A colorful and patterned scarf, framed in a distressed wooden frame without matting. This framed scarf adds a bohemian vibe to a living room or hallway.
- The Vintage Charm: A vintage silk scarf with an intricate design, framed in an ornate antique frame with a velvet matting. This framed scarf becomes a statement piece in a vintage-inspired room or gallery wall.
FAQ
How do you frame a scarf in an acrylic frame?
- Select the Right Frame:
- Choose an acrylic box frame that’s deep enough to accommodate the scarf without compressing it, ensuring the frame’s dimensions fit the scarf’s size once properly displayed.
- Prepare the Background:
- Cut a piece of acid-free mounting board to fit the inside dimensions of the frame. This board will serve as the background to which the scarf will be attached. Choose a color that complements the scarf.
- Mount the Scarf:
- Carefully iron the scarf to remove any wrinkles, using a protective cloth if necessary to avoid damage.
- Plan the scarf’s layout on the mounting board, considering how you want it to be displayed (fully spread out, folded, etc.).
- Once you’re satisfied with the layout, you can mount the scarf. For a non-permanent method, use acid-free pins or small stitches at key points to secure the scarf to the mounting board. For a more permanent solution, use an acid-free fabric adhesive, applying it sparingly to avoid bleeding through the scarf.
- Assemble the Frame:
- Carefully place the mounted scarf and board inside the acrylic box frame. If the frame has a backing board, secure it in place following the frame’s instructions. Ensure the frame is clean and dust-free before sealing it.
- Seal the Frame:
- Follow the manufacturer’s instructions to seal the acrylic frame. Some frames come with clips or screws to secure the back, while others might be sealed with a special adhesive. Ensure the seal is tight to prevent dust from entering.
- Display Your Framed Scarf:
- Choose a spot out of direct sunlight to prevent fading. If your frame didn’t come with hanging hardware, attach a suitable hanging system based on the frame’s weight and wall type.
Remember, the key to framing a scarf in an acrylic frame is ensuring the materials used (like the mounting board and any adhesives) are acid-free to preserve the fabric over time. Additionally, securing the scarf without causing damage allows for the possibility of wearing it in the future if desired.
How do you display a scarf as art?
Framing:
- Traditional Framing: Place the scarf behind glass in a traditional picture frame. Use acid-free backing and matting to preserve the scarf’s fabric. This method is ideal for showcasing detailed patterns or silk scarves.
- Acrylic Box Frame: For a more modern look, an acrylic box frame can give the scarf a floating appearance, adding depth to the display.
Hanging Directly on the Wall:
- Dowel Rod or Curtain Rod: Attach the top edge of the scarf to a wooden dowel or decorative curtain rod and hang it on the wall. This method works well for larger, lightweight scarves and allows easy changes.
- Clip Hangers: Use decorative clip hangers to grip the scarf at two or more points along the top edge. This method is simple and doesn’t require any alterations to the scarf.
Conclusion
Framing a scarf is a wonderful way to transform it into a work of art and add a unique touch to your home decor. By following this step-by-step guide on how to frame a scarf, you can showcase your favorite scarves in a way that highlights their beauty and craftsmanship. Whether you choose to frame a scarf or explore alternative ways to use scarves as home decor, remember to let your creativity and personal style shine through. Embrace the art of framing and enjoy the beauty and elegance that a framed scarf can bring to your living space.
CTA: Now that you have learned the art of framing a scarf, it’s time to unleash your creativity and start framing your own scarves. Share your framed scarf creations with us in the comments below! Any question about how to frame a scarf please contact us.

